
First-Time Quick Setup
Both the web and desktop versions open the quick setup when no text model is available. You can close the popup first to browse existing content, but you need to complete the configuration before starting Auto Director, chapter generation, or other AI creation tasks.1
Select a provider
Choose a built-in provider for which you already have an account. DeepSeek Flash is recommended, balancing Chinese long-form quality and response speed; to use a local model, select the local provider, which does not require an API Key.When using a relay service or other OpenAI-compatible interface, click Add Third-Party Provider.
2
Connect the model
Fill in the API Key and API address, then select a model from the list, or directly enter the model name.
3
Detection
The system separately detects plain text and structured output capabilities. After passing, the selected model will be used for core tasks such as planning, body text, review, repair, re-planning, and summarization, without needing to configure routing item by item.When detection fails, what you entered is retained, and the page will separately explain which item did not pass; fix it and retry directly.
Models and Providers Page
Open System Settings → Models & Providers. The page has three blocks from top to bottom:- Model Providers: a card for each added provider, plus the Add Provider button. The badge next to the title shows how many connections are available.
- Maximum Wait per Generation: see Other Model-Related Settings.
- AI Prompt and Response History: see Other Model-Related Settings.
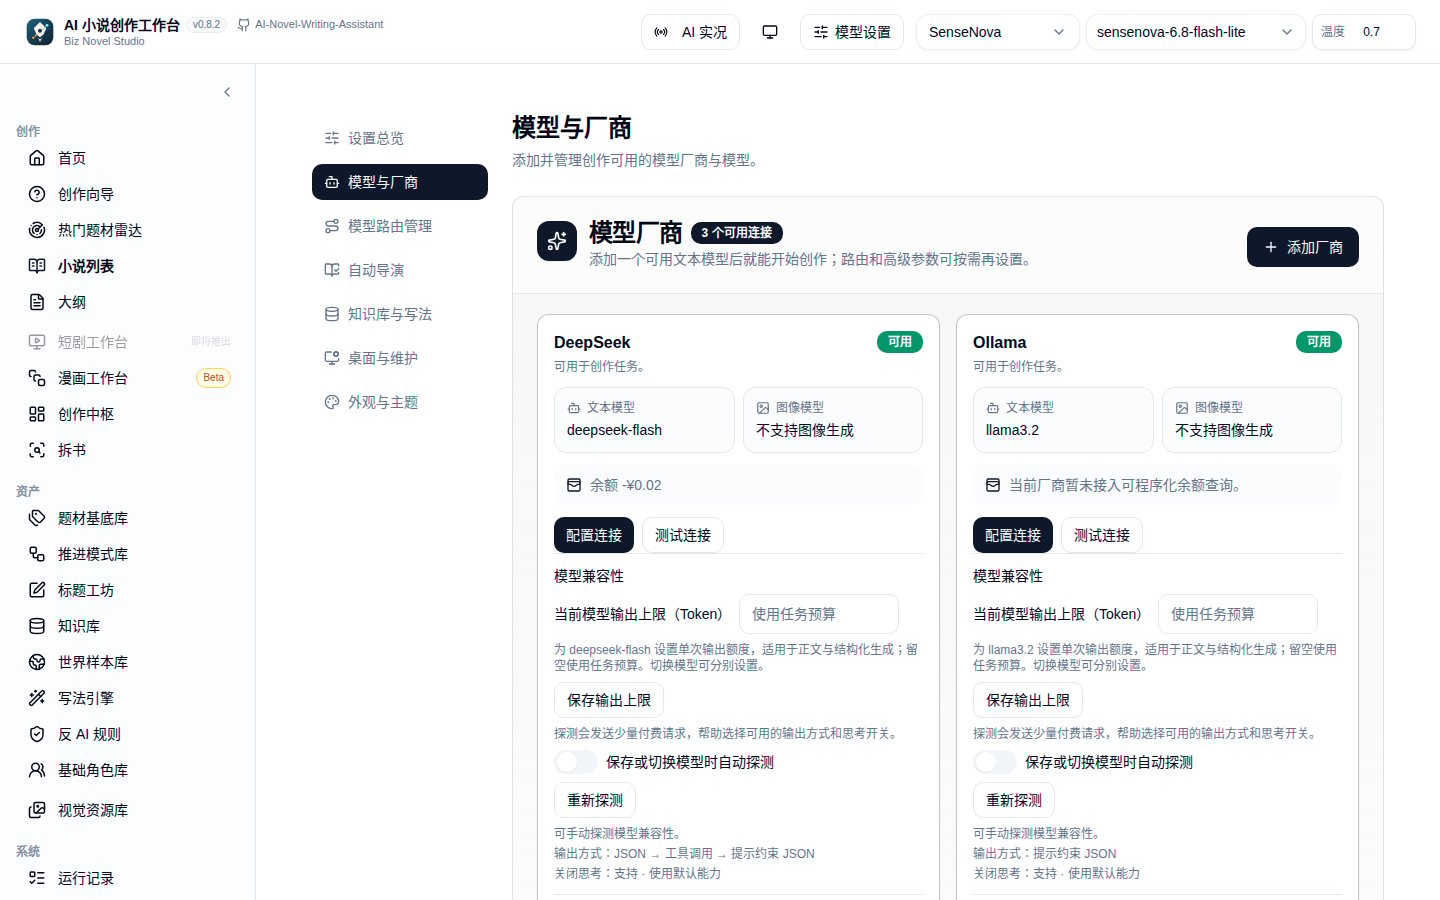
The Models & Providers page: one card per added provider, with the Add Provider button at the top right
Add a Provider
Click Add Provider at the top right to open the “Add Model Provider” dialog. It offers two kinds of options:- Built-in provider templates: lists the built-in providers you have not added yet, each showing its recommended model.
- Custom provider: connects any OpenAI-compatible service, such as a relay, a model gateway, or LM Studio.
Add a Built-in Provider
1
Choose a template
In the “Add Model Provider” dialog, click the built-in provider you want. The “Configure Model Provider” dialog opens.
2
Enter the API Key
Paste the API Key you created in the provider’s console. Ollama runs locally and does not need a Key.
3
Confirm the API address
Usually leave this blank; a blank value uses the default address in the table below. Change it only when you use a proxy or the provider gave you a dedicated address.
4
Choose a model
In Model Name, select or type a model name. If unsure, use the template’s recommended model.
5
Test and save
Click Test Connection to confirm that both plain connectivity and structured output work, then click Save.
Built-in Providers
Add a Custom Provider (OpenAI-Compatible)
Relay services, self-hosted gateways, LM Studio, and any service compatible with the OpenAI interface format are connected as custom providers. Add Third-Party Provider in quick setup is the same feature.1
Choose Custom Provider
In the “Add Model Provider” dialog, click Custom Provider. The “New Custom Provider” dialog opens.
2
Enter a provider name
Give it a recognizable name, such as “My Model Gateway”. The name is required; you pick the provider by this name in routing later.
3
Enter the API Key and authentication method
The API Key can be left blank (for example, for a local service). Authentication Method decides which request header carries the Key:
- Authorization: Bearer: used by most OpenAI-compatible services
- x-api-key: choose this when the service requires an
x-api-keyheader - No Authentication: for local or intranet services
4
Enter the API address
Enter the OpenAI-compatible API address, which usually ends with
/v1, for example https://your-relay-domain/v1. The API address is required when creating a provider.5
Fetch the model list and choose a default model
Click Fetch Model List. The system reads the available models from the service and selects the first one automatically. You can search and switch in Available Models, or type a model name directly. The default model is optional when creating; the system picks one for you.
6
Test and create
Click Test Connection, and once it passes, click Create Provider.
Three Common Connection Methods
Configuration Dialog Fields
Clicking a built-in provider template, Configure Connection on a card, or Manage Connection on a custom provider card opens the configuration dialog.
Buttons at the bottom of the dialog: Save (Create Provider when creating a custom provider) and Test Connection; custom providers also have Delete.
If the save button is grayed out, a required item is usually missing: no model, no name for a custom provider, no API address when creating, or a built-in provider that needs a Key but has never had one saved.
Notes When Filling In
- API Key: Do not copy extra spaces; confirm that the Key’s corresponding supplier and API address are consistent, and that the account has quota and model permissions. When connection fails, first confirm in the supplier console that the Key is valid, then return to the app to test.
- API Address: Must be consistent with the supplier’s documentation. Common errors include writing too much or too little of the path (for example, missing
/v1), or filling in a web address instead of an API address. Proxies or network restrictions can also prevent requests from arriving. - Model Name: Copy from the supplier’s documentation or the model list; do not guess.
Test Connection
Both the configuration dialog and the provider card have Test Connection. The API address and model must be filled in first. The test checks two things at once:- Plain connectivity: whether the model returns text normally
- Structured output: whether the model can return structured results as required, and which output strategy the system will use
Provider Cards
Each added provider gets one card. From top to bottom:Switch a Provider’s Default Model
Click Configure Connection (Manage Connection for custom providers), select a new model in Available Models or type one in the model name field, and save. If the model list is empty or outdated, first click Refresh Models in Advanced Details and Maintenance.Model Compatibility
Providers and models differ widely in how they support structured output and thinking controls. The Model Compatibility area on the card sets the output limit and probes which output method suits the current model.Current Model Output Limit
Sets the single-request output allowance for the current model, for both body text and structured generation. The range is 1 to 1048576 tokens; enter a value and click Save Output Limit.- Leave it blank to “use the task budget”, which is then decided by model routing or the system default.
- The value is saved per model, so you can set it separately after switching models.
- Once set, it takes priority over “Max Output Length” in model routing. See How Output Limits Take Effect.
Compatibility Probing
- Auto-probe when saving or switching models: when on, the system probes every time you save or switch a model. Off by default.
- Re-probe: runs a probe manually right away.
- Output method: the structured output methods available for the current model, in priority order, for example “JSON → Tool Calling → Prompt-Constrained JSON”. From strictest to loosest, the four methods are Strict JSON, JSON, Tool Calling, and Prompt-Constrained JSON. The system tries them in order and falls back to the next one when one fails.
- Disable thinking: shows “Supported” or “Not confirmed”.
- The time of the last probe; if never probed, it shows that default capabilities are in use.
Specify Custom Service Capabilities
Only custom providers have this option, which expands at the bottom of the compatibility area. Use it when the probe result is inaccurate or you know exactly what the service supports:
After you click Save Specified Capabilities, the specified capabilities override the probe results.
Advanced Details and Maintenance
Advanced Details and Maintenance at the bottom of the card is collapsed by default. Expanded, it contains the following actions and information.Refresh Models
Refresh Models reads the provider’s available model list again. Use it when the provider adds new models, or when you cannot find a model in the configuration dialog. Models are shown as tags, with the model in use highlighted. The first 8 are shown by default; click Show all N models to see the rest.Hide and Restore Models
When a provider returns many models, click the × on a model tag to hide models you do not use, which keeps dropdowns tidy. The model currently in use cannot be hidden. Hidden models are listed under Hidden Models, where you can restore them one by one or click Restore All.Balance
DeepSeek, SiliconFlow, and Kimi support balance queries. Click Refresh Balance to get the latest balance. Expanded, you can see details such as cash balance, voucher balance, top-up balance, total top-ups, and granted credit (the exact items depend on what the provider returns). Custom providers do not support balance queries.Thinking
The Thinking switch controls whether creation requests enable model thinking (reasoning). It is on by default:- On: creation requests enable model thinking, and the thinking content returned by the provider is shown in AI Live View.
- Off: requests ask the provider to turn thinking off.
Request Limits
Shows the current “Concurrency N · Interval Nms”. If a relay service rate-limits you or you often see rate-limit errors such as 429, lower Concurrency Limit per Model or raise Request Interval per Model in the configuration dialog.API Address
Shows the API address the provider is actually using, so you can verify it.Remove or Delete a Provider
- Built-in providers: Remove from List removes the card from the page. You can add it back later through Add Provider.
- Custom providers: Delete deletes the connection.
Model Routing Management
Quick setup makes one model handle all core tasks. To have different tasks use different models, or to adjust the temperature and output length of a single task, open System Settings → Model Routing Management.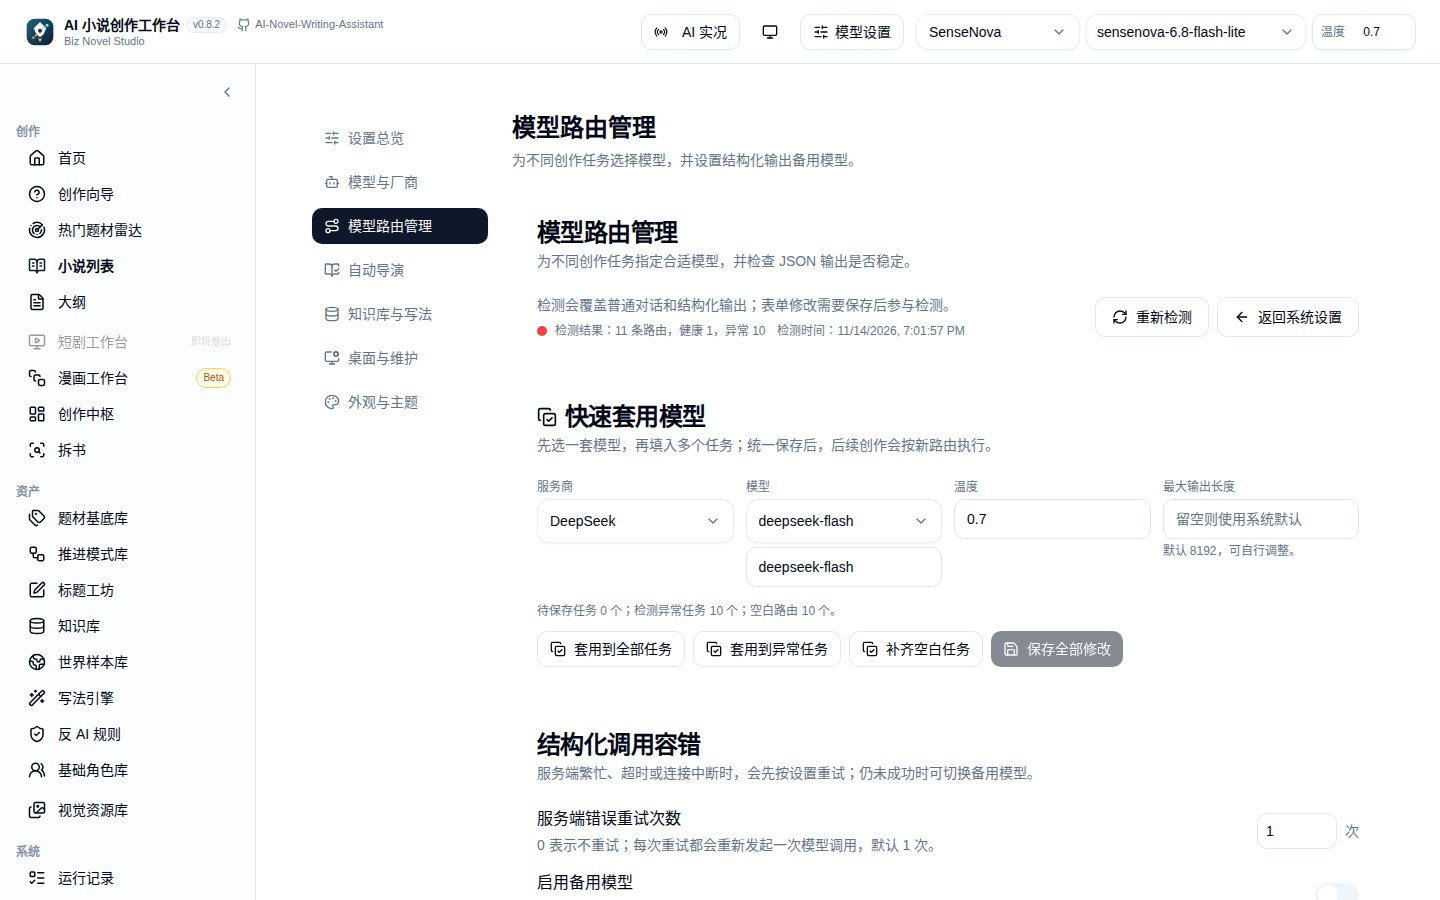
Model Routing Management page: assign models to different creation tasks and check output stability
Route Detection
The top of the page shows the detection result (how many routes in total, how many healthy, how many failing) and when detection ran. Re-detect tests plain text and structured output for every route. Each task card shows its own status: Compatible, Has Issues, Detecting, or Not Detected. Cards with unsaved changes are marked Unsaved and must be saved before they can be tested.Quick Apply Model
When you do not want to set each task one by one, use the Quick Apply Model card for bulk changes:- Choose a Provider and Model, and optionally fill in Temperature and Max Output Length.
- Choose where to apply it:
- Apply to All Tasks: switches every task to this model
- Apply to Failing Tasks: replaces only tasks that failed detection
- Fill Empty Tasks: fills only tasks that are not configured yet
- The applied changes are drafts. The card shows the number of unsaved, failing, and empty routes. When everything looks right, click Save All Changes.
Tasks with no saved route use the system’s built-in default route (the DeepSeek default model). If you have not configured DeepSeek, use Fill Empty Tasks to point all empty tasks at a model you have configured.
Task Routes
Route Fields
Below the fields, the card shows the request protocol, structured strategy, and thinking status actually in use, and whether a fallback model is available. Click Save Route when done. If auto-probe is on in model compatibility, saving also runs a probe.
Structured Call Fault Tolerance
Planning, review, and similar steps need the model to return structured results. The Structured Call Fault Tolerance card controls what happens on failure:- Retries on Server Errors: 0 to 3, default 1.
- Enable Fallback Model: after retries still fail, tries once more with the fallback provider and model set here. Useful when the main model is occasionally unstable.
Model Selection Tips
- Outline Planning, Window Re-planning: use a capable model with stable output. Slow local large models are prone to timing out on long outputs.
- Lead Writing: use a model with suitable writing style and context length.
- Reviews, Plot Summary, Setting Fact-Check: a more cost-effective model works; Strict Review affects whole-book continuity, so avoid models that are too weak.
How Output Limits Take Effect
How many tokens a request can output is decided in this order:- Model Compatibility → Current Model Output Limit: used first if set for the model.
- Model Routing → Max Output Length: the route setting for the task.
- The system default when neither is set.
A model’s single maximum output and Auto Director’s single-chapter usage limit are two different things. For the single-chapter limit, see AI Usage.
Other Model-Related Settings
The Models & Providers page has two more settings below the provider cards:- Maximum Wait per Generation: how long a single world generation request may wait, in minutes; the page shows the allowed range. Two minutes is enough for cloud models; raise it if your local model is slow. It applies from the next world generation, and the system may retry once automatically after a failure.
- AI Prompt and Response History: when Save prompts and responses is checked, creation messages and model responses are saved and can be viewed in the novel’s “AI Usage and Call Logs”. You can set Retention Days (1 to 365) and Compressed Storage Limit (MB) (1 to 4096). Every 15 minutes, the system cleans up expired or over-limit content, removing the oldest records first. The content may include full body text, so turn it on only if you need it. Turning it off stops saving new content; duration and usage statistics are not affected.
Common Issues
Cannot find the model you want Click Refresh Models in the card’s Advanced Details and Maintenance; check whether the model is under Hidden Models. If it is still not in the list, type the model name directly in the configuration dialog. Generation is cut off halfway / output length insufficient Raise the output limit in Model Compatibility or model routing. Your explicit setting takes precedence over the system default; setting it too small will cause long chapters or structured results to be truncated. Structured steps report errors or return empty content Planning steps require the model to return strict structured results. Reasoning (thinking) models may consume the output quota in the thinking process at this step, leaving the result empty. Turn thinking off in Thinking, or switch planning steps to a non-reasoning model; body text steps are not affected. You can also click Re-probe to let the system choose the output method again; for custom providers, you can specify custom service capabilities. If it still fails, enable the fallback model in Structured Call Fault Tolerance. Relay service rate-limits frequently In the configuration dialog, lower Concurrency Limit per Model (for example, to 1 or 2) or raise Request Interval per Model. Local model always times out Local large-parameter models have limited generation speed, and planning steps with long outputs are more prone to timing out. First route planning steps to a cloud model and only use the local model for body text, or switch to a smaller local model, and confirm that the local service remains running throughout. For world generation timeouts, raise Maximum Wait per Generation. Connection test passed but generation still fails Detection only verifies address, key, and model reachability; for generation failures, see the pause reason given by the director console and Run History. Most cases are insufficient quota, model routing not configured for the corresponding step, or output limit too small. When reporting issues, include the version number, model used, and original error text for fastest localization.Shortest Verification After Configuration
- Complete model detection.
- Create a test novel.
- Let Auto Director generate direction candidates.
- Generate Chapter 1.
- View status in Run History.